

|
User Guide |
| User Guide | Transform Guide | OSW on the Web | |
In the section, we look at some of the programming features of OSW in greater detail.
In “Getting Started,” we saw how transforms are specified using both a class name for the type of transform being created and an instance name that uniquely labels the transform.OSW automatically creates an instance name unless you specify one with the “-name” option. Although you will probably let OSW name your transforms most of the time, there are cases where giving your transforms special names comes in handy, such as when you want one transform to refer to another. Suppose you were doing synthesis using a custom wavetable: you would add a Table transform to your patch, and a WaveTable transform which takes the name of the table transform as an argument. By default the Table would be given a name like “table0” or “table1,” but you might want to give a more descriptive name that you could use for reference. Similarly, when you create a SampleBuffer, you will probably want to give it a name descriptive of the sound it stores and use the more descriptive name when referring to the buffer from SamplePlayer transforms.
You might notice that some transform inlets have a green triangle, while others have a gray triangle:

The green signifies that the inlet is active and will cause new data to be produced by one or more outlets. Passing the mouse over an active inlet will cause all such outlets to flash a similar green triangle. Gray inlets are passive and do not produce output, although they may be used during computation triggered by active inlets.
Open the “activepassive” tutorial patch [Note: you must have OSW running in order to access help or tutorial patches from this document.]. Notice that the left inlet of the multiplication operator is active, while the right inlet is passive. Change the values of the number boxes connected the inlets and see what happens.
If you haven’t already done so, click on an outlet that already has a connection: you get a new connection that can drag, but the old one disappears. Likewise, try dragging a new connection onto an already connected inlet: once again, the old connection is broken. This is not a bug, but an important feature of OSW that enhances its efficiency and flexibility (and also makes it easier for both humans and computers to interpret patches). One of the few unbreakable rules in OSW programming is there can be at most one connection leaving any outlet or entering any inlet. If you want to connect an outlet to several inlets, use a FanOut transform. FanOut takes an option –outputs n where n is the initial number of outputs you want from the FanOut (the default is 2). Likewise, if you want to connect several outlets to one inlet, use a FanIn transform. Like FanOut, FanIn takes an option –inputs n where n is the initial number of inputs you want into the FanIn (once again, the default is 2).
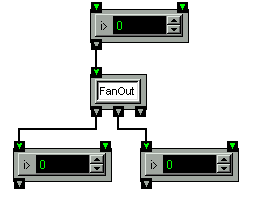
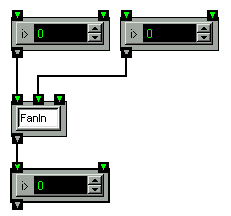
Suppose you don’t know the number of branches you want out of a Fanout or into a Fanin. Fortunately, you don’t have to. When a Fanout or Fanin runs out of outlets or inlets, respectively, a new one is automatically added for your convenience.
An important feature of OSW is its powerful type system. Inlets and outlets of transforms are “strongly-typed,” meaning that they can only accept certain types of data. If you were wondering why some inlets, outlets and connections have different colors, it is to help you distinguish between certain data types. If you attempt to connect an outlet and inlet whose types are incompatible you will get a rude warning message.
OSW includes a large number of built-in data types, including integer and floating-point numbers, strings, boolean (true/false) values, lists and audio samples. However, OSW can handle almost any kind of data type, provided there are transforms to manipulate it.
Arguments to transforms often require specific types. Consider the command to instantiate a Sinewave transform whose name is “joe” and whose initial frequency is 256.1 (Middle C):
Sinewave –name joe –freq
256.1
The “-name” parameter required a string argument, “joe”, and the “-freq” argument required a floating-point argument, 256.1. OSW recognizes many types of arguments in commands:
Transforms that require the user to enter data (e.g., MessageBox) use the same representations as command arguments.
OSW includes several transforms for doing basic arithmetic, including the basic binary operators: addition (+), subtraction (-), multiplication (*), division (/) and modulus (or remainder) (%)- as well as the basic relational operators (==,!=,<,>,<=,=>). The transforms for each of these operators works on many types, including Integers, Floats, Samples and (in some cases) frequency-domain spectra. OSW automatically determines the function and result type of an arithmetic operator depending on what you connect to it. For example, if both arguments are numerical types, then the output is also a number.

Note that arithmetic operators accept an optional argument. This is the default second argument of the operator if nothing is connected to the right inlet.
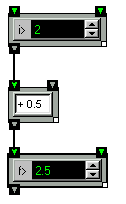
If either or both of the operator’s inlets are of Samples types, than the output is also Samples. For example, the multiply operator can act as an amplifier with the left inlet accepting Samples and the right inlet accepting a (floating-point) number:

Or both inlets of the multiplication can be Samples, creating a “ring modulator:”
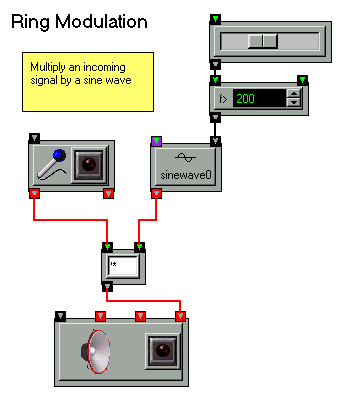
Notice that the amplifier uses the normal version of the multiply operator * that has one active and one passive inlet, while the ring modulator uses a different version '* (i.e., an asterisk preceded by an apostrophe) with two active inlets. In these examples the distinction between active and passive inlets (as discussed in section 3.2 and the activepassive tutoral) is very important. For the amplifier, we did not want to wait for the value of right inlet to change since the user might be quite happy using the current value, so we used the normal “non-blocking” version. Each of the arithmetic and relational operators have both a non-blocking and a blocking version. To use the blocking version, simply precede the operator symbol with an apostrophe (').
See the arithmetic operators help page for additional details.
OSW includes most of the standard math functions for trigonometry, logarithms/exponentiation, etc. Like the arithmetic operators, there is one transform for each function that accepts both numeric and sample types and does the right thing in each case. See the math functions help page for more details.
The math function and arithmetic transforms can be connected to form complex mathematical expressions. However, this can be quite tedious for expressions with many operators. The Expr transform allows such expressions to be written more succinctly and intuitively. In the following example, the same expression is implemented first using primitives and then using Expr:
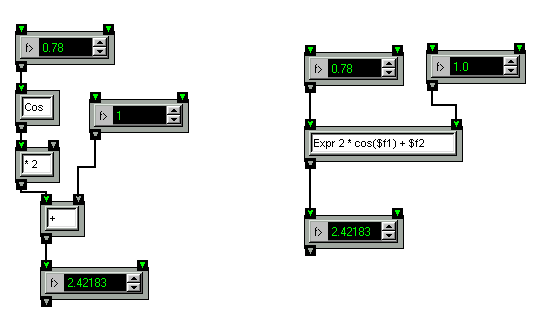
Variables in an Expr expression are specified as $name elements. The first letter of name is used to determine the type (e.g., “i” for Integers, “f” for Floats, “d” for Doubles, “s” for Samples). An inlet of the appropriate type is created for each variable.
You can do a lot in OSW just using numbers, strings and audio samples. But it’s often more convenient to manipulate larger, more complex structures.
Lists are ordered sequences of values. You can create a List using a MessageBox transform:

Anytime you place more than one item in a MessageBox, it outputs the items as a List. In fact, in the “Hello World” example, you actually created a List consisting of the two Strings “Hello” and “World”. (If you want to put multiple words in a single String, place them inside quotes.) Lists can also be created with the List and Pack transforms.

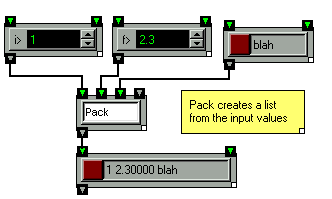
There are no restrictions on what you can put in a List. You are free to make Lists with items of different types, including other Lists:

This List consists of the strings ‘a’, ‘b’, and ‘c’ followed by a sub-list of the integers 1, 2 and 3. You can have a List with many sub-lists, or sub-lists of sub-lists, etc.
There are many transforms for operating on Lists. See the List tutorials for examples.
One caveat about Lists: Since they can contain elements of any type, list-manipulation transforms often deal w/ dynamic or variant types, which are discussed a later section.
Lists are quite versatile and easy to use, but they do have their limitations. Suppose you wanted to store the pitch, volume and duration of a note. You could easily create a List where the first element is the pitch, the second is the volume, and the third is the duration, but you would have to remember to always use the same order when constructing the Lists or selecting elements. Also, suppose you did not want to always specify or use the volume parameter. The duration is now the second element instead of the third, and you need to change all your patches accordingly. The ordering of elements is not as important as the “meaning” of each element.
In situations like this, a Blob is probably more useful than a List. A Blob is an unordered data structure with one or more property-value pairs. You can create a Blob using the MakeBlob transform.

Double-clicking a MakeBlob transform brings up a text window in which you can enter your properties. The name of the property comes first, followed by a colon (users of Max collections can use a comma instead), the value or list of values and finally a semicolon. The following example defines a Blob with three properties:
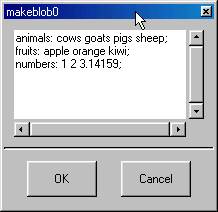
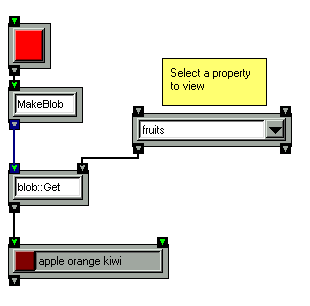
Use the blob::Get transform to retrieve the value associated with a given property:
The blob::Set transform can be used to change the value associated with a property, or add a new property if it doesn’t already exist in the Blob.
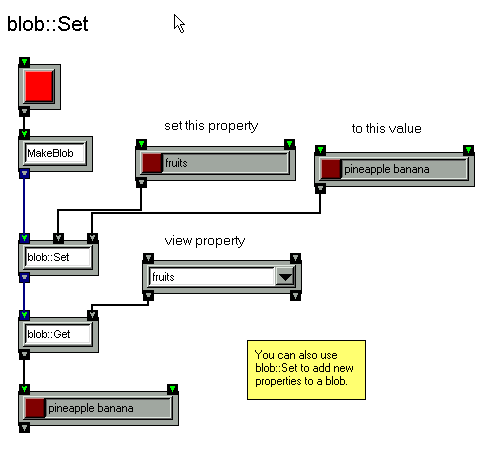
Open the help patch for blob::Set to try out this example. Note that any changes you make to a Blob using blob::Set do not change the original property definitions in the MakeBlob transform (you can double-click it to confirm this). The changes only effect transforms downstream from the blob::Set.
Blobs are extremely versatile, allowing you to create your own data types in patches. Blobs also form the basis for specifying notes and scores in OSW (see the section on making music for more information).
Tables store pairs of floating-point numbers.The first number in each pair is an index that can be used to look up the value of the second number .The indices in a table are usually evenly spaced over a range (e.g., from 0 to 1). For example, a table could contain 100 indices 0,0.01,0.02,… up to 0.99. Tables can also be viewed as function approximations over a range: the lookup value at an index is the value of the function evaluated at the index. If a user attempts to lookup a value between two indices, the table will linearly interpolate between the values for the two indices (transforms that use tables can apply custom interpolation functions or turn it off altogether. [Note: most transforms currently opt for the latter]).
Common uses of tables are wavetable synthesis using WaveTable transform and windowing functions for FFT’s. OSW includes several built-in tables for these applications:
Users can also create their own tables using the Table transform.
Hash tables are arrays of name-value pairs. If you think that sounds suspiciously like a Blob, you’re absolutely right. However, they do serve different purposes. Blobs are usually small and are passed from one transform to another like most data in OSW. Hash tables, on the other hand, cannot be passed between transforms. A hash table exists as a static structure within a HashTable table transform, which can be used to access or modify individual elements. The main uses of hash tables are for implementing large data structures or when compatibility with Max coll objects is needed. See the HashTable transform for more information.
Many transforms operate on specialized data types. For example, the FFT transform outputs a “Spectrum” data type representing a frequency-domain spectrum. The MidiOutput transform accepts data of type “MidiMessage” that wraps the channel, status and values of a MIDI message into one convenient (or inconvenient) box. These data types help you to write complex operations without having to worry about the underlying implementation. Plus, since they usually can’t be connected to anything but the transforms that are designed to use them, it prevents lots of potentially bad situations.
You can always find out if a transform uses a special type by moving the mouse over its inlets and outlets or reading its help page.
Some transforms include an outlet of type called any. Such outlets can be connected to any inlet. Every time a new data value is sent from the outlet to the connected inlet, the type of the data must be checked to ensure that it is compatible with the inlet. If it not, an error occurs and the data is not processed by the receiving transform. The most common examples of variant types are free variables used with Put and Get and transforms that access elements of Lists or Blobs.
Some transforms include dynamically typed inlets. Dynamic-typed inlets are assigned a type at connection time. If the inlet is reconnected to an outlet of a different type, then its type will change accordingly. The FanIn and FanOut transforms as well as the basic arithmetic operators have dynamic-typed inlets. Notice that when you connect something to dynamic-typed inlets, the types of the outlets may change, and any connections from the outlets might disappear if they are no longer valid with the new type.
The difference between dynamic type and variant type is subtle but significant. Dynamic-typed inlets change their type to match connected outlets, while variant-type outlets maintain a single type any that does not change but can be connected to inlets of many different types.
Be careful when connecting a variant-type outlet to a dynamic-type inlet! A dynamic inlet infers its type from its connection, but it cannot do that if the connection is a variant type. This could be a problem, for example, in an arithmetic operator which needs to know its input types to perform the right function. It is therefore a good practice to use the TypeFilter transform when connecting a variant-type outlet to a dynamic-typed inlet.
OSW provides several ways to direct the flow of execution in patches. The simplest method is to use the Switch transform. Switch looks a lot like a FanOut with an extra inlet. However, instead of sending its input to all the outputs, Switch directs the input only to the selected output, as determined by the number sent to the second inlet. In the following example, the value of the slider is directed to the right outlet of the Switch. Changing the value of the integer box to 0 would redirect the output of the slider to the left outlet.

Output can also be conditionally directed using the If transform. If takes three expressions that
use the same syntax as Expr. If the
first expression is true, then the second expression is
evaluated and the result is output via the left inlet. If the first expression evaluates to false, the the third expression is evaluated and the result is output via the right inlet. The above example can be modified to use
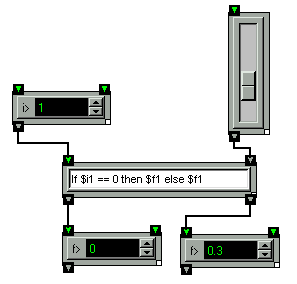
Most of the time, values are transmitted from transform to another via explicit connections between them, as we've seen in every example up to this point. OSW also includes a mechanism for transmitting and broadcasting values without connections using the special transforms Put and Get. See the Put and Get help patch for more information and examples. Put and Get can save a lot of tedious wiring, but their use sometimes makes patches harder to follow, so use them wisely.
Oftentimes it is necessary to perform some initialization steps every time a patch is loaded. In OSW, you can trigger these actions by using the implicit "load" variable that is set for each patch when it is loaded. A transform specified as "Get load" will output a unit when your patch is finished loading.
Eventually you may find that your patches are getting too complex (and big!) for you to manage easily, or you may find yourself copying the same section of your patch to use in several places. In OSW, you can easily deal with these problems by creating your own "subpatches" that can be used within the current patch or in other patches just like normal OSW transforms. In fact, OSW provides a few facilities for creating user-defined transforms.
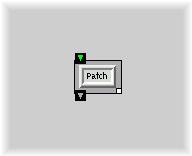
The most direct way to encapsulate your program's logic in your own transforms is to use the Patch transform. First create a transform using the 'Patch' command. You will notice that Patch currently has no inlets or outlets.
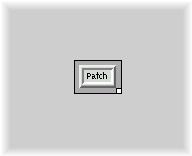
Now double click on the Patch transform to bring up a new patch window. The name of this new subpatch is /<parent patch name>/<subpatch name>. You can add and connect transforms in this subpatch just as you would normally, but there are two special transforms you can use in a subpatch: Inlet and Outlet. These are the transforms you use to create inlets and outlets for your subpatch. The type of these inlets and outlets is determined by the type option, and you can specify the name that you see in the parent patch for each inlet or outlet with the name option. For example, if you want an outlet called 'stringOut' of type String, you would create it with the command 'Outlet -name stringOut -type String'. It is imperative that you correctly specify the type for Inlets and Outlets so that you can connect to them in both your subpatch and your parent patch.
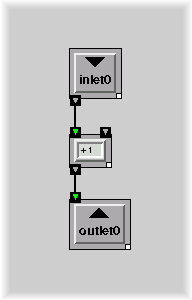

The Patch is an excellent way to encapsulate your OSW programming in a single patch, but what if you would like to use that same subpatch in other patches? Fortunately, OSW has a very simple mechanism to provide this functionality. You create a patch as you normally would, except that you can use the inlets and outlets in the manner described above. After saving this patch, you can use it like any other transform by typing the patch's file name (without the ".osw" extension) as the command. You can use relative or absolute paths when specifying the file name. For example, if you create a patch called 'PlusOne' in the '/OSWPatches' directory (UNIX) or the 'C:\OSWPatches' directory (Windows) to use in other patches, you could create the transform representing PlusOne with the command '/OSWPatches/PlusOne' (UNIX) or 'C:\OSWPatches\PlusOne' (Windows). Again, you must designate the correct type for your Inlet and Outlet transforms in order to ensure correct type checking.
There is one very special transform that you can use to access the patch that you are currently in: This. The This transform will have inlets and outlets corresponding to the Inlet and Outlet transforms in the current patch. This can be used to create recursive transforms, or transforms that use copies of themselves in their computation. While recursion is an extremely useful programming paradigm, it may take some time and practice to effectively use it in your own patches. Browse the tutorial patches for examples of recursive programs. Also keep in mind that while recursion can be used to solve problems that are very difficult to solve by other means, it can significantly affect the processing time for your patch. If there is a simple iterative solution to the problem at hand, you may want to use this approach instead.
Finally, you can create your own transforms using the C++ programming language and the externalizer tool in the OSW distribution. You must have a C++ compiler installed on your computer and correctly configured. Using the externalizer, you can create transforms that are efficient and have access to the underlying data structures used in OSW. This method may also be used when there are no reasonable solutions to a given problem that you can express in normal OSW patches. While this is the most versatile way of creating your own transforms, it is also the most difficult and requires some knowledge of C++. See the externalizer user guide for more details.
You might be wondering why some of the transforms in the previous sections had such funny-looking names, like “list::Map.” The “list::” represents the name of a package. Packages are nothing more than a convenient way of grouping transforms (such as “all the transforms that operate on Lists” or “all the transforms written by Joe Schmoe, Jr.”). Packages also allow different transforms to have the same class name (e.g., we could also have “foo::Map”) without interfering with each other. You can always leave off a package name and OSW will try and find the first transform class that fits the name, but if you want to be specific and avoid name clashes, use package names.